Pages

Friday, 15 November 2013

A Short History of Windows


An operating system is the collection of software that controls how the computer works.  If you have a PC or IBM format computer chances are pretty good that you are running a Windows Operating System from a company called Microsoft.  Windows Operating Systems have been around since this and you should be familiar with some of the names and chronology of their development.

Below is a diagram showing the basic development of the Windows operating system from 1990 to 2013

Windows Operating Systems

1990
1991
1992
1993
1994
1995
1996
1997
1998
1999
2000
2001
2002
2003
2004
2005
2006
2007
2008
2009
2010
2011
2012
2013

The most recent Windows operating system has the unique feature of being designed to run on desktop computers, laptops, tablets (Microsoft Surface) and even smart phones. This concept could have many advantages in a technology world where the proliferation of different devices and operating systems can seem overwhelming. Unfortunately, this has required a fundamental shift in the user experience which resulted in a difficult backlash from many consumers.


Tuesday, 13 August 2013

Window XP and Window-7 Versions


Window XP and Window-7 Versions:
Following is a list of the major Windows XP versions that Microsoft shipped between
2001 and 2006. In a moment, we’ll compare these products with their corresponding Vista versions:

 Windows XP Starter Edition (underdeveloped countries only)
Windows XP Embedded (sold in embedded devices only)
Windows XP Home Edition
Windows XP Home Edition N (European Union only)
Windows XP Media Center Edition
Windows XP Tablet Edition
Windows XP Professional Edition
Windows XP Professional Edition N (European Union only)
Windows XP Professional Edition K (South Korea only)
Windows XP Professional x64 Edition
Windows XP for Itanium-based systems
All Windows XP product versions, except Windows XP Professional x64 Edition, and
Windows XP for Itanium-based systems were available only in 32-bit versions.

 Windows Vista Ultimate—which was originally available only with select new PCs from Dell and, eventually, at retail—and you’ve got 18.  something. Here’s the list:

 Windows Vista Starter
Windows Vista Home Basic
Windows Vista Home Basic (x64)
Windows Vista Home Premium
Windows Vista Home Premium N (European Union only)
Windows Vista Home Premium (x64)
Windows Vista Home Premium N (x64) (European Union only)
Windows Vista Business
Windows Vista Business K (South Korea only)
Windows Vista Business N (European Union only)
Windows Vista Business (x64)
Windows Vista Business K (x64) (South Korea only)
Windows Vista Business N (x64) (European Union only)
Windows Vista Enterprise
Windows Vista Enterprise (x64)
Windows Vista Ultimate
Windows Vista Ultimate (x64)
Windows Vista Ultimate Product (RED) Edition

Monday, 12 August 2013

Ethernet Cable Summary

Ethernet Cable Summary

Specification Cable Type Maximum length

10BaseT

Unshielded Twisted Pair 100 meters

10Base2

Thin Coaxial 185 meters

10Base5

Thick Coaxial 500 meters

10BaseF

Fiber Optic 2000 meters

100BaseT

Unshielded Twisted Pair 100 meters

100BaseTX
Unshielded Twisted Pair 220 meters

Monday, 22 July 2013

Window -8 Inside Out


                                                          Window -8 Inside Out
Interacting with Windows 8
Whereas Windows 7 had a Start button that was always visible, and applications typically
Had menus and toolbars that remained visible, one of the design goals of Windows 8 is to
Completely immerse you in full-screen applications. Instead of wasting screen space on buttons, Windows 8 makes the corners and edges of the screens active, but it does not label
Them, so it is important for even the most experienced Windows users to learn the location
Of these new controls. While these new controls will not be immediately obvious to most
Windows users, learning them takes just a few minutes. Windows 8 is designed to be equally usable with a touch screen or a conventional mouse and keyboard. The sections that follow briefly describe the different ways you can control Windows 8.
Touch controls
Windows 8 and apps designed for Windows 8 are accessible using tablet computers without a mouse or keyboard. The touch controls are intuitive, especially if you have a Smartphone. However, some of the controls will not be obvious the first time you use Windows 8. This section describes the basic touch controls.
Tap
Tapping, like clicking with a mouse, performs an action. For example, tap an app on the

Start screen or a link in Internet Explorer to open it. To select text within an app, tap it, and then use the circles to adjust the selection, as showing Figure 1-1. Tap the selection to copy or paste it.


Hold
Holding your finger on an object can do one of two things, depending on the app:
Display information about the object, much like hovering over an object with the
Mouse.
Swipe
The edges of the screen are really important in Windows 8. By swiping a finger in from the
Edges and corners of the screen, you can perform different actions regardless of the app
You have open: Swipe from the right side of the screen to view the charms for searching,
Sharing, and printing. Swipe from the left side of the screen to bring up a list of previously used apps. Swipe from the top or bottom of the screen to view app-specific commands, which
Function like an app’s menu.
Slide
Slide your finger across the screen to drag objects and scroll the screen, as shown in Figure
1-3. for example, to scroll left or right on the Start screen, just touch anywhere on the
Screen and slide to either side. To view a list of recently used apps (equivalent to holding down the Alt key and repeatedly Pressing Tab), tap the upper-left corner of the screen and then slide your finger down. You can then slide an app to dock it to one side of the screen, or slide it to the bottom of the Screen to close it.
Flick
Flick objects to select them. A flick is a short, quick, downward swipe. For example, you
Would tap a tile on the Start screen to open the app, but flick it to select the tile so you can
Change its settings.
Mouse controls
Windows 8 also provides new mouse controls:
●● Move your mouse to the upper-left corner to view the most recently used app. Click
       to open it or drag it to the side of the screen to snap it.
●● Move your mouse to the lower-left corner and then click to open the Start screen.
●● Move your mouse to the upper-left corner and then slide it down (without clicking)
       to view a list of recently used apps.
●● When viewing the list of recently used apps, click an app to open it or drag it to the
      side of the screen to snap it.
●● Move your mouse to the upper-right or lower-right corner to view the charms. Click a
       Charm to use it.
●● Right-click most apps to view the app command. Some apps, such as Internet
       Explorer, provide traditional context menus when you right-click.
●● Drag an app from the foreground to either side of the screen to snap it.
●● Right-click the lower-left corner to open quick links.

Saturday, 6 July 2013

Configuration and Managing DHCP Server:


                            Configuration and Managing DHCP Server:

What is DHCP Server?
The Dynamic Host Configuration Protocol (DHCP).DHCP is a network protocol that enables a server to automatically assign an IP address to a computer from a defined range of numbers (i.e., a scope) configured for a given network. It provides IP address to client computer in a network, it’s used address resolution protocol (ARP) it provides IP address with default 8 days.

Step by Step Installation of DHCP Server on Server 2008.
To install a DHCP server from the Control Panel, follow these steps:
  • From the Start menu, select -> Control Panel -> Administrative Tools -> Server Manager.
  •  Expand and click Roles (Image 1).
  •  Choose Add Roles and follow the wizard by selecting the DHCP role (Image2).
  •  A new DHCP wizard appears to help you configure a DHCP server
  •  Click on next
  •  Click on install and close.

Image 1 :Click on Add Roles:


Image 2 Select DHCP :


Image 3 Click On Next:


Image 4 Installation Begins:


  • After completing this Installation just click on finish.


Step by Step Configuration of DHCP Server on Server 2008
To install a DHCP server from the Control Panel, follow these steps:
  • From the Start menu, select -> Control Panel -> Administrative Tools -> DHCP
  •  Spend the DHCP server
  •  spend the IPV-4
  •  Right Click the IPV-4
  •  Now click on new Scope -> Click on Next
  •  Give the Scope Name -> Click on next
  • Please Give the IP Range
  •  Start IP Range – 10.0.0.2
  •  End IP Range – 10.0.0.40
  •  Click on next
  •  Click the Exclusion Range
  •  Click on Add
  • Those IP address we don’t want to give on client PC or any other computer
  •                      10.0.0.30 :10.0.0.35
  •  Click on Next and Finish
  • Now you can use your DHCP server 2008.

Vishal


Wednesday, 26 June 2013

Microsoft Window Server 2008 Step by Step Installation

Windows Server 2008
Windows Server 2008 is one of Microsoft Windows' server lines of operating systems. Its officially released on February 27, 2008, it is the successor to Windows Server 2003, released nearly five years earlier. A second release, named Windows Server 2008 R2, was released to manufacturing on July 22, 2009. Like Windows Vista and Windows 7, Windows Server 2008 is based on Windows NT 6.x. window server 2008 is the most advanced windows yet designed to power the next generation of network
System Hardware Requirements of Window Server 2008
Component
Requirement
Processor
 Minimum: 1 GHz (x86 processor) or 1.4 GHz (x64 processor)
Memory
Minimum: 512 MB RAM
Available Disk Space
Minimum: 10 GB
Drive
DVD-ROM drive
Peripherals
Keyboard/Mouse

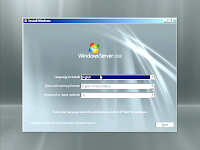
Step By Step Installation server 2008
1.       Insert the window server 2008 DVD into DVD ROM of Computer.
2.       Select the language Than Click on Next.

                      
3.        Click on Install Now.
4.       Enter the 25 character Product Key
5.       Click [YES] if you inserted the product key if you not inserted 25 character
        Product key select [NO] Click on Next.
6.       Select your window server 2008 product version and check Box at the bottom of the screen
   ☑. I have selected the edition of window that I purchased.
7.       Accept the license click on next.
8.       Click to Custom Installation.
9.       Now need to create a Hard Disk Drive Partition: Click on next.
10.   Select a partition where you want to install window server 2008
11.   Click on next.
12.   After clicking next this session will start the installing process.
13.   After completing installation process system will automatically reboot.
14.   After rebooting you should see similar to the following screen here you need to 
        click on [ok]
15.   Give Administrator Password Two times than click arrow Mark.
16.   Password changed successfully and now you can login now.

Configure Server Roles on Window Server 2008
1.       Click On Start -> Programs -> Administrator Tools-> Select server Manager
2.       Double Click On Roles.
3.       Click on ADD Roles.
4.       Click on next Bypass welcome screen
5.       Now you will see the select roles screen
6.       Checkmark the Box if you want to install any server Roles.
7.       Click Next to continue.
8.       Click Install to being Installation
9.       After Few mints Installation will complete now you can start the using your server 2008 .

Tuesday, 18 June 2013

What are the Functions keys and how it works in Computer:


Function key

A function key is a key on a computer or Terminal Keyboard which can be programmed so as to cause an operating system command interpreter or application program to perform certain actions. On some keyboards/computers, function keys may have default actions, accessible on power-on. Function keys on a terminal may either generate short fixed sequences of characters, often beginning with the escape character (ASCII 27), or the characters they generate may be configured by sending special character sequences to the terminal. Commonly known as "function keys", F1 through F12 may have a variety of different uses or no use at all. Depending on the installed operating system and the software program currently open will change how each of these keys operate.


 Function key: F1
Ø  Almost always used as the help key, almost every program will open the help screen when this key is pressed.
Ø  Enter CMOS SetUp.
Ø Windows Key + F1 would open the Microsoft Windows help and support center.
Ø  Open the Task Pane.

Function key: F2
Ø  In Windows renames a highlighted Icon, File, or Folder in all versions of Windows.
Ø  Alt + Ctrl + F2 opens document window in Microsoft Word.
Ø  Ctrl + F2 display the print preview window in Microsoft Word.
Ø  Quickly Rename a selected file or folder.
Ø  Enter CMOS SetUP.

Function key: F3
Ø  Often opens a search feature for many programs including Microsoft Windows when at the Windows Desktop.
Ø  In MS-DOS or Windows command line F3 will repeat the last command.
Ø  Shift + F3 will change the text in Microsoft Word from upper to lower case or a capital letter at the beginning of every word.
Ø    Windows Key + F3 opens the Advanced find window in Microsoft Outlook.
Ø  Open Mission Control on an Apple computer running Mac OS X.

Function key: F4
Ø  Open find window in Windows 95 to XP.
Ø  Open the Address bar in Windows Explorer and Internet Explorer.
Ø  Repeat the last action performed (Word 2000+)
Ø  Alt + F4 will close the program window currently active in Microsoft Windows.
Ø  Ctrl + F4 will close the open window within the current active window in Microsoft Windows.

Function key: F5
Ø  In all modern Internet browsers pressing F5 will Refresh or reload the page or document window.
Ø  Open the find, replace, and go to window in Microsoft Word.
Ø  Starts a slideshow in PowerPoint.

Function key: F6
Ø  Move the cursor to the Address Bar in Internet Explorer, Mozilla Firefox, and most other Internet browsers.
Ø  Ctrl + Shift + F6 open to another open Microsoft Word document.

Function key: F7
Ø  Commonly used to Spell Check and Grammar Check a document in Microsoft programs such as Microsoft Word, Outlook, etc.
Ø  Shift + F7 runs a Thesaurus check on the word highlighted.
Ø  Turns on Caret browsing in Mozilla Firefox.

Function key: F8
Ø  Function key used to enter the Windows startup menu, commonly used to access Windows Safe Mode.

Function key: F9
Ø  Opens the Measurements toolbar in Quark 5.0.
Ø  With Mac OS 10.3 or later shows all open Windows.
Ø  Using the Fn Key and F9 at the same time will open Mission Control on an Apple computer running Mac OS X.

Function key: F10
Ø  In Microsoft Windows activates the Menu Bar of an open application.
Ø  Shift + F10 is the same as Right- Clicking on a highlighted icon, file, or Internet link.
Ø  Access the Hidden Recovery -Option  on HP and Sony computers.
Ø  Enter CMOS Setup.
Ø  With Mac OS 10.3 or later shows all open Windows for active program.

Function key: F11
Ø  Full-screen mode in all modern Internet browsers.
Ø  Ctrl + F11 as computer is starting to access the Hidden Recovery partition on many Dell computers.
Ø  Access the Hidden Recovery partition  on EMachines, Gateway, and Lenovo computers.
Ø  With Mac OS 10.4 or later hides all open windows and shows the Desktop.

Function key: F12
Ø  Open the Save as window in Microsoft Word.
Ø  Shift + F12 save the Microsoft Word document.
Ø  Ctrl + Shift + F12 print a document in Microsoft Word.
Ø  Preview a page in Microsoft Expression Web
Ø  Open FireBug.
Ø  With an Apple running Mac OS 10.4 or later F12 will show or hides the Dashboard..
vishalmassey.blogspot.com

AddThis